#Tutorial ESP32 GPS
Explore tagged Tumblr posts
Visit Tumblr Blog
Explore Tumblr blogs with no restrictions, modern design and the best experience.
Last Seen Tumblr Blogs


Fun Fact
The Tumblr office adopted Tommy, an 11-year-old Pomeranian.
Text
DIY: Marauder with Screen and GPS For Flipper Zero
Many of you would have seen the humongous ESP32 add-on module with touch screen and GPS for Flipper Zero shared in discussion groups, forums, etc. Well, this tutorial will provide you with all the information you need to build one yourself.
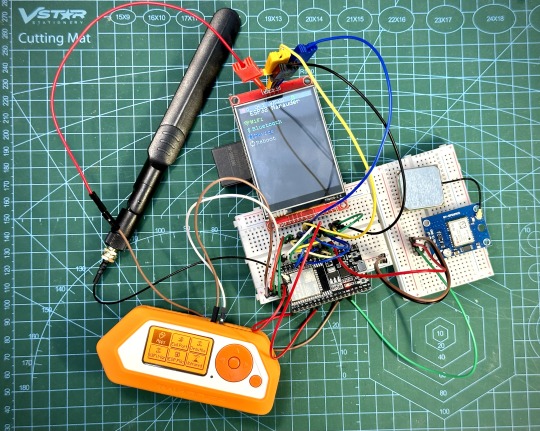
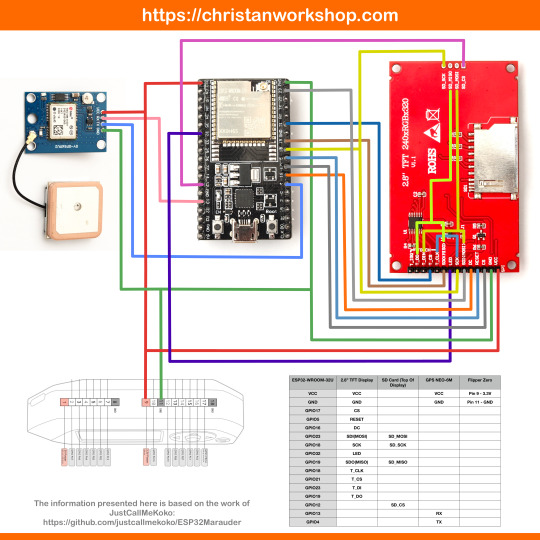
This build consists of mainly 4 parts. The TFT LCD 2.8" 240x320 SPI ILI9341 Touch Display cost me around US$5.50, the ESP32-WROOM-32U module cost around US$3, the NEO-6M GPS module cost around US$2.20 and an 8dbi 2.4GHz Wifi Antenna which cost around US$2. All of these parts can be easily found in online marketplaces like Aliexpress, Amazon, etc. Here is how you need to wire them up together. How you wish to lay this out or mount on a prototyping board is entirely up to you. As long as the connections are correct, you are good to go. The GPS module is optional, and mainly, it's used for the war driving functionality.
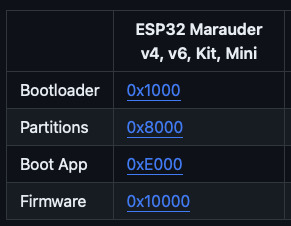
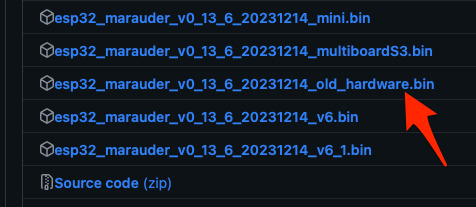
Next, you need to download all the firmware needed from here. Please download the Bootloader, Partitions, Boot App and Firmware files for v4 (Yes, v4 files, not any others) and save it on your computer.
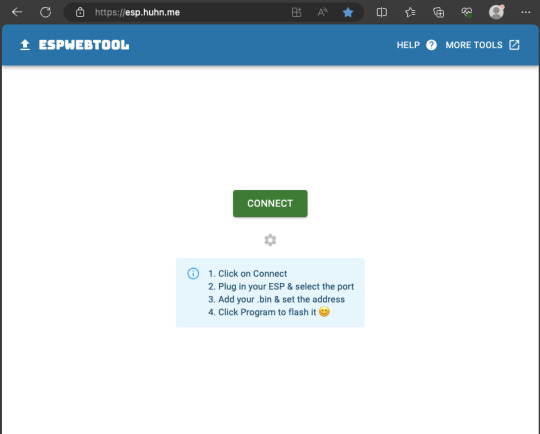
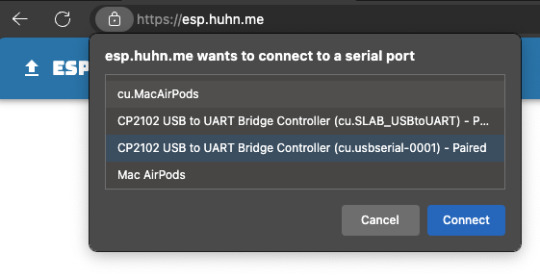
Now, press and hold the BOOT button on your ESP32-WROOM-32U module and connect it to your computer using a data-capable USB cable (some USB cables can only charge), then let go the BOOT button. Open Google Chrome or Microsoft Edge browser and go to ESPWebTool. Click the CONNECT button, then select the ESP32 usb serial connection. It should look something like below but can vary a little between different computers and operating systems.
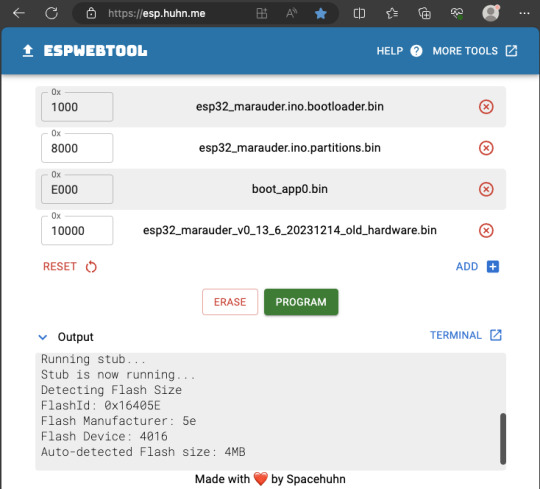
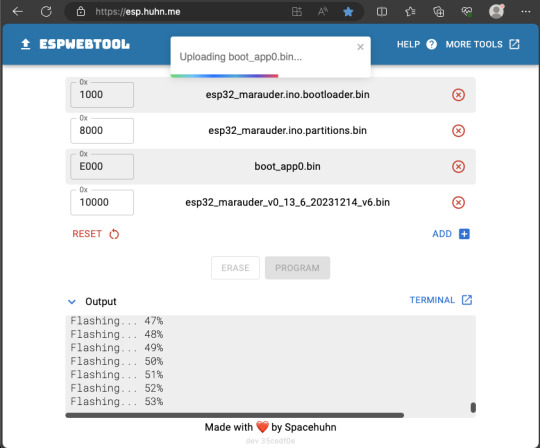
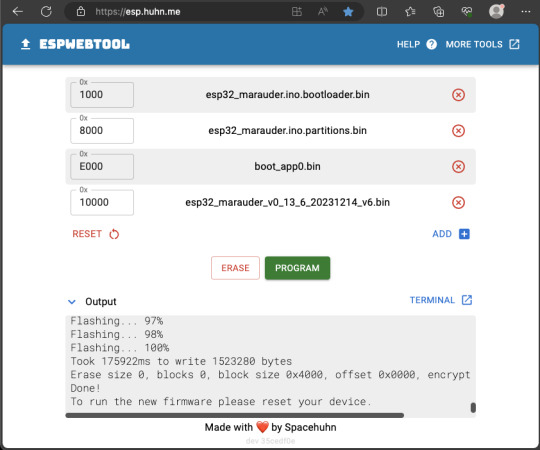
Select the firmware files for each slot exactly like below (take note of the 0x1000, 0x8000, etc. and their corresponding .bin files), then hit the PROGRAM button.
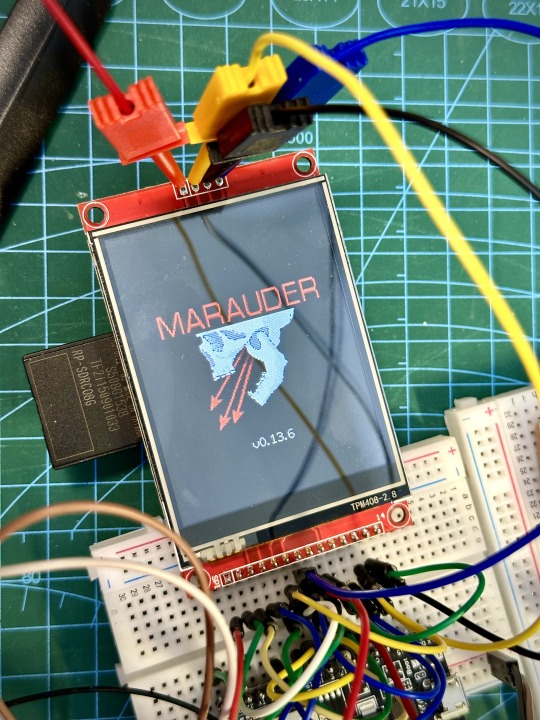
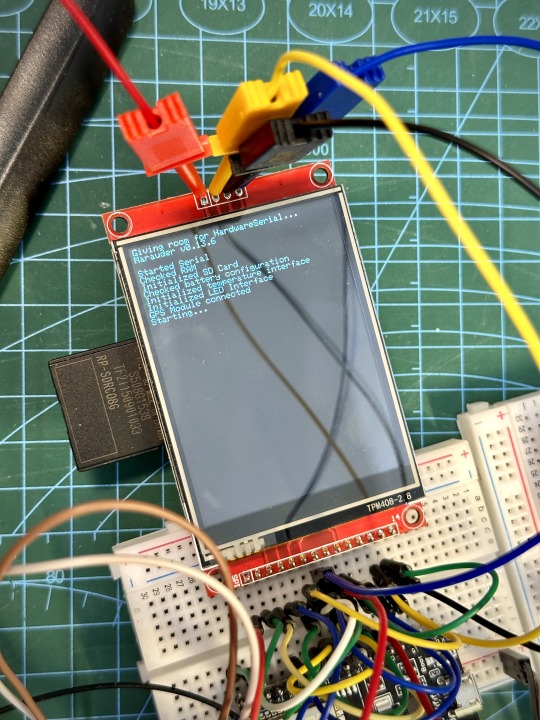
When completed successfully, you can unplug the USB cable from the ESP32 module and now you can connect your Marauder module to your Flipper Zero. Please ensure that your Flipper Zero is turned off before you connect it, and also turn off your Flipper Zero before disconnecting it. The 3.3V pin is also used by your Flipper Zero's SD card reader and connecting/disconnecting external modules that use this pin while the Flipper Zero is on can potentially corrupt the SD card. So, if everything went according to plan, your Marauder module should boot up and everything should look like below.
NOTE: If your Marauder boots up, but when you try to touch the screen and get no response, try tapping around the bottom part of your screen and see if the touch panel seems to be in inverted position from the actual display. Should this happen to you, just flash your ESP32 module again following the steps above, but use the v6 firmware. This should resolve the issue.
In this build, I just prototyped this on breadboard, but you can of course make it permanent by soldering it on to a prototype board and 3D print a case for it. This setup is essentially just using the Flipper Zero as a battery pack, instead of using the Flipper Zero to control Marauder. The large screen does make some things easier to do, compared to the small screen of the Flipper Zero, and there may be some functionality (not much) that is not currently in the Flipper Zero Marauder companion app. Here is a video showing the different menus in Marauder.
Personally, I don't think I will actually want to bring something so big around with me, along with my Flipper Zero. I think what makes Flipper Zero special is just how compact it is and all the different functionality cramped into it. This would probably be better off as a standalone unit by just hooking up a battery, but that's just me. Well, that's it for this tutorial. I hope you found this helpful.
Here's a good intro to Marauder if you are unfamiliar.
youtube
18 notes
·
View notes
Text
Tutorial Arduino Real Time Clock GPS Neo 6M Sesuai Timezone
Tutorial Arduino Real Time Clock GPS Neo 6M Sesuai Timezone
Bawaan waktu dari GPS Neo 6M tidak sama dengan waktu yang ada di indonesia, dan itu artinya GPS Neo 6M tidak menggunakan timezone jakarta. Pada artikel ini akan dibahas cara mudah menggunakan RTC GPS Neo 6M sesuai Zona Waktu Indonesia. Tutorial Arduino GPS Neo 6M, Tutorial ESP32 GPS Modul, Program ESP8266 NodeMCU GPS Neo 6M Perbedaan waktu bawaan GPS dengan waktu yang sebenarnya di Indonesia…

View On WordPress
#Arduino GPS Program#GPS Arduino#GPS Tracker Arduino#Kode GPS Arduino#Program Mudah GPS 6M Arduino#Setting Waktu RTC GPS Arduino#Tutorial ESP32 GPS#Tutorial ESP8266 GPS#Tutorial GPS Neo 6M Arduino#Tutorial NodeMCU GPS Modul
0 notes
Text
This tutorial is based on Real-Time GPS Monitoring using M5Stick C (ESP32) with the help of Qubitro's GPS Mapping System. Things used in this project Hardware componentsM5Stack M5StickC ESP32-PICO Mini IoT Development Board×1M5Stack Mini GPS/BDS Unit×1Software apps and online servicesQubitroArduino IDEGoogle Colab Story In this DIY tutorial, we are going to build an IoT-based GPS Location tracker using M5Stack GPS Unit and M5Stick C. Here, we have used Qubitro as a Cloud platform to Map the GPS Coordinates, and this coordinates will be mapped by using Google Colab with the help of simple python script. Hardware Connections: Just kidding, there is no hard-wiring in this tutorial, simply connect the GPS unit with M5StickC, that's all. Let's Compile: I used Tiny GPS library, It's very simple to use with maximum GPS units, and all the Cloud Integration could be found in the Qubitro documentation page and upload the below Qubitro_Gps.ino sketch to the M5StickC. #include #include #include #include TinyGPSPlus gps; HardwareSerial ss(2); float Lat, Lng; String lat_str , lng_str; int sat, battery = 0; float b, c = 0; // WiFi Client WiFiClient wifiClient; // Qubitro Client QubitroMqttClient mqttClient(wifiClient); // Device Parameters char deviceID[] = "Qubitro-Device-ID"; char deviceToken[] = "Qubitro-Device-Token"; // WiFi Parameters const char* ssid = "ELDRADO"; const char* password = "amazon1234"; void setup() M5.begin(); M5.Lcd.setRotation(3); M5.Lcd.fillScreen(BLACK); M5.Lcd.setSwapBytes(true); M5.Lcd.setTextSize(1); M5.Lcd.setCursor(7, 20, 2); M5.Lcd.setTextColor(TFT_GREEN, TFT_BLACK); ss.begin(9600, SERIAL_8N1, 33, 32); wifi_init(); qubitro_init(); void loop() while (ss.available() > 0) if (gps.encode(ss.read())) if (gps.location.isValid()) void wifi_init() // Set WiFi mode WiFi.mode(WIFI_STA); // Disconnect WiFi WiFi.disconnect(); delay(100); // Initiate WiFi connection WiFi.begin(ssid, password); // Print connectivity status to the terminal Serial.print("Connecting to WiFi..."); while (true) delay(1000); Serial.print("."); if (WiFi.status() == WL_CONNECTED) Serial.println(""); Serial.println("WiFi Connected."); Serial.print("Local IP: "); Serial.println(WiFi.localIP()); Serial.print("RSSI: "); Serial.println(WiFi.RSSI()); M5.Lcd.setTextColor(RED); M5.Lcd.setCursor(0, 8); M5.Lcd.printf("Network Connected"); break; void qubitro_init() char host[] = "broker.qubitro.com"; int port = 1883; mqttClient.setId(deviceID); mqttClient.setDeviceIdToken(deviceID, deviceToken); Serial.println("Connecting to Qubitro..."); if (!mqttClient.connect(host, port)) Serial.print("Connection failed. Error code: "); Serial.println(mqttClient.connectError()); Serial.println("Visit docs.qubitro.com or create a new issue on github.com/qubitro"); Serial.println("Connected to Qubitro."); M5.Lcd.setTextColor(RED); M5.Lcd.setCursor(0, 25); M5.Lcd.printf("Uplink Established"); mqttClient.subscribe(deviceID); delay(2000); M5.Lcd.fillScreen(BLACK); void batteryLevel() c = M5.Axp.GetVapsData() * 1.4 / 1000; b = M5.Axp.GetVbatData() * 1.1 / 1000; // M5.Lcd.print(b); battery = ((b - 3.0) / 1.2) * 100; if (battery > 100) battery = 100; else if (battery < 100 && battery > 9) M5.Lcd.print(" "); else if (battery < 9) M5.Lcd.print(" "); if (battery < 10) M5.Axp.DeepSleep(); Serial.print("battery: "); Serial.println(battery); void printDate() Serial.print(gps.date.day()); Serial.print("/"); Serial.print(gps.date.month()); Serial.print("/"); Serial.println(gps.date.year()); // printTime() formats the time into "hh:mm:ss", and prints leading 0's // where they're called for. void printTime() Serial.print(gps.time.hour()); Serial.print(":"); if (gps.time.minute() < 10) Serial.print('0'); Serial.print(gps.time.minute()); Serial.print(":"); if (gps.time.second() < 10) Serial.print('0'); Serial.println(gps.time.second());
Data Visualization: Once you upload the code to M5Stick C, go to your Qubitro Device Portal and you can see the create a chart tab. Qubitro Device Page After clicked the Creation a Chart tab, select chart type as map and select the data variables ( like longitude, latitude as per the tabs) Create a Chart (Map) page That's all, now you are good to go, navigate to the Analytics area, and you can see the uploaded GPS Co-ordinates are mapped. Mapped Co-ordinates Mapping with Google Colab: If you want to map your whole location data, here I'm used python script which can phrase GPS co-ordinates and map. First you have to download the Data from Qubitro Portal by the format of CSV (now in Beta Stage), then log in to google colab and import the below python script. Import the downloaded CSV files from the Qubitro Portal. Execute the blocks one by one (make sure to rename the files in both script and files). So it's very simple and easy to use python script, Once you executed the final block you can find the logged map (sample CSV file uploaded in the GitHub). Device in action Code Qubitro GPS Mapping # import libraries + wardriving data import pandas as pd wd = pd.read_csv ('Neo-Baby-Walk.csv') # import list of all GPS Data from CSV file to pandas data frame wd.sample(100) # sample 10 random devices from dataset # len(wd) # number of detected devices # start mapping devices import folium from folium import Map, Marker basic_map = folium.Map(location=[33.675899,-117.602236 ],zoom_start=17) # manually pick scope of map folium.PolyLine(wd[['Latitude', 'Longitude']].values.tolist(),line_opacity = 0.5, weight = 4).add_to(basic_map) # plot route display(basic_map) https://github.com/Kyoot-Create/Qubitro
0 notes
Text
Tutorial Arduino Real Time Clock GPS Neo 6M Sesuai Timezone
Tutorial Arduino Real Time Clock GPS Neo 6M Sesuai Timezone
Bawaan waktu dari GPS Neo 6M tidak sama dengan waktu yang ada di indonesia, dan itu artinya GPS Neo 6M tidak menggunakan timezone jakarta. Pada artikel ini akan dibahas cara mudah menggunakan RTC GPS Neo 6M sesuai Zona Waktu Indonesia. Tutorial Arduino GPS Neo 6M, Tutorial ESP32 GPS Modul, Program ESP8266 NodeMCU GPS Neo 6M Perbedaan waktu bawaan GPS dengan waktu yang sebenarnya di Indonesia…

View On WordPress
0 notes
Text
i2c LCD with NODEMCU | Interface I2C LCD Using ESP8266 NodeMCU | I2C LCD on NodeMCU With Arduino IDE
youtube
I2C LCD on NodeMCU V2 With Arduino IDE | Interface I2C LCD Using NodeMCU | NodeMCU ESP8266 Interface with 16×2 LCD Display Screen | How to Connect an LCD Display to ESP8266 NodeMCU | I2C LCD with ESP32 on Arduino IDE - ESP8266. ****************************************************************** If You Want To Purchase the Full Project or Software Code Mail Us: [email protected] Title Name Along With You-Tube Video Link Project Changes also Made according to Student Requirements http://svsembedded.com/ è https://www.svskits.in/ M1: +91 9491535690 è M2: +91 7842358459 ****************************************************************** 6. NodeMCU 16x2 LCD on Arduino IDE - Robo India || Tutorials, 7. Interfacing LCD with NodeMCU ESP12 without using I2C, 8. Wiring NodeMCU ESP8266 12E with i2C 16×2 LCD Screen, 9. Connect LCD I2C Nodemcu ESP8266 Easily in 5 Minutes, 10. ESP8266 or ESP32 I2C LCD display Interface | Circuits4you, 11. nodemcu lcd display without i2c, 12. how to interface nodemcu with lcd, 13. 16*2 lcd interfacing with nodemcu, 14. esp8266 16x2 lcd without i2c, 15. esp32 i2c lcd, 16. nodemcu with rfid lcd i2c, 17. interface lcd display with nodemcu directly, 18. lcd module nodemcu, 19. step by step : Nodemcu Esp8266 I2C lcd display, 20. NodeMCU 1.0 and I2C - Arduino Forum, 21. LCD Display Tutorial for Arduino and ESP8266, 22. ESP8266 NodeMCU 16×2 LCD Interface, 23. Wiring NodeMCU ESP8266 12E with i2C 16×2 LCD Screen, 24. how to connect an i2c lcd display to an esp8266, 25. NodeMcu (ESP8266) Tutorial 7: the serial LCD I2C , 26. Display LCD I2C com NodeMCU, 27. Connect an LCD display to the NodeMCU ESP8266 Tutorial, 28. NodeMCU Lesson 15 — I2C 1602 LCD & MQTT, 29. Node-mcu Esp8266 I2C lcd display, 30. Nodemcu Devkit (esp8266) Display Temperature on an I2c, 31. display temperature and humidity data using LCD on Nodemcu, 32. LCD Display Tutorial for Arduino and ESP8266, 33. GPS + GSM Based Underground Cable Fault Detection with Arduino, 34. Electric Shock + GPS Hand Glove Developed to help Women's Safety & Self Defense, 35. GSM Based Motor Controller in Irrigation by Using Sensor's [ Soil Moisture + Tank Water Level ], 36. Petrol Bunk Automation with Prepaid Card using GSM Identification, 37. IoT Based Water Level Monitoring System, 38. Smart Garbage Monitoring System Using Internet of Things (IOT), 39. Automated Smart Trolley with Smart Billing Using Arduino | RFID Based Smart Shopping Cart, 40. Traffic Signal Management and Control System using Arduino with 4 servo motors, 41. Hand Gesture Controlled Robot using Arduino | How to Make a Gesture Control Robot, 42. Arduino Based Vehicle Accident Alert System Using GSM, GPS, MEMS, VIBRATION and SOS, 43. How to Make VOICE CONTROLLED Car by using ARDUINO, 44. Women Safety Device With GPS Tracking & Alerts, 45. GPS + GSM Based Smart Blind Stick Tracking System Project, 46. Auto Metro Train to Shuttle Between Stations, 47. IOT Underground Cable Fault Detector Project, 48. Reading GPS Data With a Raspberry Pi | GPS on Raspberry Pi | Raspberry Pi GPS reading, 49. Smart Glove For Deaf and Dumb using Arduino Controls Remote Devices, 50. voice based notice board using android and arduino, 51. Voice Control Home Automation System Using Arduino, 52. IoT Based Food Spoilage Detection System using Arduino, 53. Automatic Power Cut Failure Alert LED Indicator - Life Hacks For Led Light - Amazing School Project, 54. Arduino Based Moving Message Display Using Bluetooth | Scrolling Display using P10 + Arduino, 55. Arduino Interface With Optical Dust Sensor, 56. Smart Home Connectivity using WiFi and Bluetooth, 57. NodeMCU Project: IOT Car Parking System Project using ESP8266, 58. Smart Traffic Light Control System with Automatic Speed Breaker / Barrier, 59. Happy New Year 2020 Front Text Scrolling LED Wall Panel, 60. How to connect servo motor to Arduino | 0 to 180 degree Rotation Control, 61. Fire Fighting Robot Controlling using Arduino with Bluetooth/WiFi, 62. Traffic Light Priority Control For Emergency Vehicle, 63. Arduino Based Fire Fighting Robot, 64. Gas Leakage Detector using Arduino and GSM Module with SMS Alert, 65. Smart Blind Stick Project using Arduino and Sensors, 66. Arduino Based Saline Bottle Weight calculation and Alert System, 67. Smart Wrist Band For Women Safety, 68. Arduino Visitors Counter | Automatic Room Light Controller with Bidirectional Visitor counter, 69. Microcontroller Based Automatic School / College Bell using Timers | School Bells | College Bells, 70. Fingerprint Based ATM Security System, 71. A Real-Time Data Acquisition System for Monitoring Sensor Data, 72. Coin Based Toll Gate System | Coin Sensing Automated Toll Gate,
0 notes
Text
How to Make A Simple WiFi Controlled Robot Car (NodeMCU) | Wifi RC Car ESP8266 App - NodeMCU (ESP12E)
youtube
Smart Robot: NodeMCU ESP8266 WiFi Robot Car + L293N + Wifi RC Car ESP8266 (NodeMCU) | How To Make A Simple WIFI Car (NodeMCU) | Wifi RC Car ESP8266 - NodeMCU (ESP12E). ****************************************************************** If You Want To Purchase the Full Project or Software Code Mail Us: [email protected] Title Name Along With You-Tube Video Link Project Changes also Made according to Student Requirements http://svsembedded.com/ è https://www.svskits.in/ M1: +91 9491535690 è M2: +91 7842358459 ****************************************************************** 1. How To Make A Simple WIFI Controlled Car (NodeMCU), 2. How to Make Arduino ESP8266 WiFi Robot Car | Controlled with Application, 3. ESP8266 NodeMCU RC car control over WiFi using RoboRemo app, 4. Smartphone controlled NodeMCU (ESP8266) 4WD WiFi Robot Car & DIY Android application, 5. How to Make Mobile Remote Controlled Car with Nodemcu | Indian LifeHacker, 6. Esp8266 NodeMcu wifi bot tutorial, 7. Arduino Project: IOT Car Parking System using Nodemcu esp8266 wifi + Blynk (Tabs + led widgets), 8. WIFI Controlled Robot | NodeMcu ESP8266, 9. How To Make A Wi-Fi Car Using NodeMCU esp8266 | Mobile Phone Controlled Car, 10. ESP8266 - WiFi Car, 11. Robot Wifi con ESP32 y Arduino Tutorial, 12. How to make Internet Controlled Car | IoT | Blynk | NodeMCU | esp8266, 13. Smartphone Controlled Arduino&NodeMCU 4WD Robot Car | WiFi Arduino&NodeMCU Robot, 14. IOT NodeMCU ESP8266 - Control de Foco Relay WebSocket WebServer, 15. How To Make A Mobile Phone Control WiFi Car Using Node MCU ESP8266 | DIY , 16. Creating a Nodemcu (Esp8266) Android phone controlled rover, 17. Arduino IOT Project: Nodemcu ESP8266 wifi Robot Car “L298N motor driver + Blynk + Joystick”, 18. Diy Amazing WiFi car mobile controlled | WiFi car V/S RC car challenge, 19. Adding WiFi controls to a RC car using Arduino, 20. NodeMcu(ESP12E) Android Wifi Controlled Rc Car Full Tutorial, 21. Arduino Project: Safe distance maintaining Car to Avoid accident” L298N and Ultrasonic Sensor”, 22. Doit.am WiFi Car and Tank Based on ESP8266 Dev Kit, 23. Arduino WİFİ Kontrollü Araba | Nodemcu Kontrollü Robot, 24. Wifi | ESP8266 NodeMCU | robot car WIFI | carrito robot con ARDUINO, 25. Wifi Robot Car/RC Car NodeMCU ESP8266 -Blynk App, 26. How to make Internet Controlled Car | IoT | Blynk | NodeMCU | esp8266, 27. V380 WiFi Camera Setup & Installation , 28. Control FAN Speed and LIGHT using TV Remote, 29. Build a surveillance robot that video streams with Arduino - Skype Shield Tutorial, 30. IoT based Smart Parking System using ESP8266 NodeMCU, 31. Smart Crop Protection From Wild Animals With Alert Using Arduino | Field Sensor Monitoring with WiFi, 32. Industrial Inspection Robot The Front Tilt Minibot, 33. How to Make Arduino ESP8266 WiFi Robot Car | Controlled with Application, 34. IOT BASED SMART BLOOD BANK SYSTEM, 35. CameraIP+ESP8266(MCU E-12), 36. Arduino DS WiFi Camera Robot - Assembly and Presentation, 37. V380 wifi Camera software installation & Setup & remote viewing on Laptop or PC Over Wifi / Local, 38. Make wireless CCTV camera using Action cam | Arduino project, 39. Make your own GPS SMS Security Tracking System, 40. WiFi Home Door Lock| Blynk | iot project, 41. How to Make a Gesture Control Robot at Home, 42. TOP 5 ESP8266 (NodeMCU) PROJECTS, 43. program arduino with android smartphone, 44. How to Make Water Overflow Alarm at Home, 45. How To Make A Simple WIFI Controlled Car (NodeMCU), 46. Arduino UNO & ESP8266 and control using smartphone, 47. How to make a | SPY Camera with | esp 8266 | Node MCU | wifi | IoT projects, 48. How To Make A DIY Arduino Obstacle Avoiding Car At Home, 49. Google Assistant | Home Automation IOT | NodeMCU ESP8266, 50. Arduino Powered Automated Security Camera, 51. Arduino RFID Solenoid Lock, 52. Arduino infrared thermometer with case MDF, 53. Bluetooth 8-Channel relay control ( Fan and Light ) board (with Android App), 54. 360° Fisheye Panoramic Wifi LED Bulb Light with Spy Camera, 55. esp8266, internet camera position control, 56. DIY | Easy IOT controlled robot With wifi camera for live streaming, 57. Top 10 IoT(Internet Of Things) Projects Of All Time | 2020, 58. Basic concept of Arduino in Hindi | Arduino tutorials for beginners, 59. how to make a ttp223 touch based Light Mirror Touch Switch Controller, 60. What is Arduino- Arduino Projects-Arduino Vs Raspberry Pi., 61. Top 7 Most Innovative Electronics DIY Projects For 2020, 62. Sonoff WiFi Smart Switch Tutorial, 63. Arduino RFID Sensor (MFRC522) Tutorial,
1 note
·
View note
Text
ESP32 Based Web Server for Temperature and Humidity Monitor using DHT11 Sensor
youtube
ESP32 Based Webserver for Temperature and Humidity Monitor using DHT11 Sensor. ****************************************************************** If You Want To Purchase the Full Project or Software Code Mail Us: [email protected] Title Name Along With You-Tube Video Link Project Changes also Made according to Student Requirements http://svsembedded.com/ è https://www.svskits.in/ M1: +91 9491535690 è M2: +91 7842358459 ****************************************************************** 1. ESP32 DHT11 Temperature & Humidity Monitor on Web Server, 2. Interface DHT11 DHT22 with ESP32 & Display Values Using Web Server, 3. IoT Temperature and humidity , 4. ESP32 Temperature and Humidity Monitor using Arduino IDE, 5. DHT11/DHT22 Web Server – Temperature and humidity, 6. ESP32 DHT11 Temperature & Humidity Monitor on Web Server, 7. Monitoring temperature and humidity with ESP32, 8. ESP32 DHT11/DHT22 Web Server using Arduino IDE – Pinterest, 9. Interfacing DHT11 Temperature and Humidity Sensor with Web Server, 10. interface dht11 dht22 with esp32 and display values on web server, 11. ESP32 Based Webserver for Temperature and Humidity, 12. ESP32 DHT11/DHT22 Web Server using Arduino IDE | Iot, 13. ESP32 web server with the DHT11 or DHT22 that displays temperature and humidity, 14. ESP32 with DHT11 Temperature Humidity Web Server, 15. Interface Embedded Protocol Embedded Sensor ESP32 ESP32 Arduino Core ESP32 Interface ESP32, 16. IoT Based Patient Health Monitoring on ESP32 Web Server, 17. esp32 dht11 mqtt - esp32 dht11 blynk, 18. esp32 web server - esp32 dht11 thingspeak, 19. esp32 async web server - dht11 esp32 library, 20. esp32 dht22 - esp32 temperature sensor, 21. AWS IOT with Arduino ESP32 - Tutorials - Explore Embedded, 22. Temperature and humidity reading by ESP32 – OpenLabPro, 23. ESP32 and SHT21 humidity and temperature sensor example | ESP32, 24. Tracking down the Vehicle Collision Detection and Messaging System using GPS and GSM 25. Sensor Data Monitoring Over CAN BUS Using Arduino | Interfacing MCP2515 CAN BUS Module with Arduino 26. How to Make A Simple WiFi Controlled Robot Car (NodeMCU) | Wifi RC Car ESP8266 App - NodeMCU (ESP12E) 27. Weather Station: DHT11 Temperature and Humidity Sensor Arduino 2.4″ TFT LCD Touch Shield - SPFD5408 28. Control FAN Speed and LIGHT using TV Remote 29. Smart Crop Protection From Wild Animals With Alert Using Arduino | Field Sensor Monitoring with WiFi 30. How to Transfer Data From One USB Hard Drive to Another USB 31. IoT based Precision Agriculture 32. IOT BASED SMART BLOOD BANK SYSTEM 33. Blood Bags Weight Monitoring Using 2 load cells 34. GSM Motor Pump controller (Mobile Motor Starter) | Automatic Mobile Starter | Mobile pump starter 35. Bus Boarding System for Visually Impaired Passengers 36. Design and Implementation of RFID-based Fuel Dispensing System 37. Cable Fault Detection System with SMS Notification using Arduino, GSM and GPS 38. 2.4'' TFT Touch Screen Restaurant Menu Ordering System Using Arduino 39. IoT Based Air, Water, Noise, Dust, Humidity, Gas, CO and Temperature Monitoring System using Arduino 40. IOT BASED SMART GARBAGE MONITORING SYSTEM USING NODEMCU + GSM + GPS + ULTRASONIC 41. i2c lcd with nodemcu | Interface I2C LCD Using ESP8266 NodeMCU | I2C LCD on NodeMCU With Arduino IDE 42. GPS + GSM Based Underground Cable Fault Detection with Arduino 43. Electric Shock + GPS Hand Glove Developed to help Women's Safety & Self Defense 44. GSM Based Motor Controller in Irrigation by Using Sensor's [ Soil Moisture + Tank Water Level ] 45. Petrol Bunk Automation with Prepaid Card using GSM Identification 46. IoT Based Water Level Monitoring System 47. Smart Garbage Monitoring System Using Internet of Things (IOT) 48. Automated Smart Trolley with Smart Billing Using Arduino | RFID Based Smart Shopping Cart 49. Traffic Signal Management and Control System using Arduino with 4 servo motors 50. Hand Gesture Controlled Robot using Arduino | How to Make a Gesture Control Robot 51. Arduino Based Vehicle Accident Alert System Using GSM, GPS, MEMS, VIBRATION and SOS 52. How to Make VOICE CONTROLLED Car by using ARDUINO 53. Women Safety Device With GPS Tracking & Alerts 54. GPS + GSM Based Smart Blind Stick Tracking System Project 55. Auto Metro Train to Shuttle Between Stations 56. IOT Underground Cable Fault Detector Project 57. Reading GPS Data With a Raspberry Pi | GPS on Raspberry Pi | Raspberry Pi GPS reading 58. Smart Glove For Deaf and Dumb using Arduino Controls Remote Devices 59. voice based notice board using android and arduino
0 notes
Text
Control ESP32 Mobile Robot Using Android Telegram App | IOT
youtube
Control ESP32 Mobile Robot Using Android Telegram App | IOT - Home Automation using Telegram Application | IOT. ****************************************************************** If You Want To Purchase the Full Project or Software Code Mail Us: [email protected] Title Name Along With You-Tube Video Link Project Changes also Made according to Student Requirements http://svsembedded.com/ è https://www.svskits.in/ M1: +91 9491535690 è M2: +91 7842358459 ****************************************************************** 1. Control ESP32 Mobile Robot Using Android Bluetooth App, 2. Controlling LED using ESP8266 and Telegram Bot - IoT Project, 3. Program Telegram Bot on ESP32 Board, 4. Control Servo With Gesture Using ESP32 and Arduino, 5. Android smartphone controlled Bluetooth robot with Arduino, 6. Control Home appliance by Telegram app using Raspberry Pi, 7. Arduino wifi motor control, 8. Telegram: Control ESP32/ESP8266 Outputs with Arduino IDE, 9. Using a Telegram Bot and a Demo Board to experiment, 10. Esp32 arduino websocket - Ring Communications, 11. voice controlled robot using wi-fi module – irjet, 12. BlueBee with Android phone! Now you can – Cytron, 13. Snake Robot Using Arduino & Multiple Servos with Bluetooth, 14. How to Make a Smartphone Controlled Mobile Robot Using ESP32, 15. Send Notifications to Your Phone From an ESP8266, 16. Arduino Blynk Lesson 3 _ Servo _ Tutorials of Cytron, 17. Controlling Raspberry Pi GPIO Pins using Telegram App, 18. ESP32 Set Up Wi-Fi Connection Using Bluetooth – Robot, 19. Virtuino ESP8266 NodeMCU web Server, 20. Wireless Bluetooth Controlled Robot using Arduino, 21. Automate ESP32 and NodeMCU using Telegram Chat App, 22. Gas Alert System with IoT and Telegram App Using ESP32, 23. home automation using telegram | esp8266, 24. ESP32-CAM PIR Intruder Alert with Photo Capture and Send Image to Telegram App, 25. How to make an android app to control a robot using MIT app inventor, 26. Control of Robot using Wi-fi and Bluetooth with Arduino, 27. Turn ON and OFF LED using mobile App using Bluetooth on ESP32 board, 28. Set Timer Based Trigger to IoT Projects using Blynk | ESP32, 29. DIY Home Automation Arduino - Using Telegram, 30. Esp32 BLE remote control with android app, 31. Track a Vehicle Using Telegram App and Live Location on Google Maps With ESP32, 32. Led Control by HTML web page with WiFi Manager library by using ESP8266(Node MCU), 33. void loop Robotech & Automation, 34. Arduino UNO & ESP8266 and control using smartphone, 35. How To Make A Wi-Fi Car Using NodeMCU esp8266 | Mobile Phone Controlled Car, 36. How to control LED through Android Mobile phone App Using ESP8266 RemoteXY, 37. How to interface bluetooth with arduino uno or mega or nano || Home automation HC05 , 38. Controlling LED using ESP8266 and Telegram Bot - IoT Project, 39. How to make Motorcycle Yamaha Sniper 150 Voice Command using Google Assistant & blynk app, 40. Voice command Engine Start using Google assistand and Blynk app, 41. Face Tracking Robot using an ESP32-CAM, 42. Arduino IOT Project: Nodemcu ESP8266 wifi Robot Car “L298N motor driver + Blynk + Joystick”, 43. The ESP32 Voyager! The Ultimate Open Source ESP32 Adventure Robot, 44. Learn to Program Arduino/NodeMCU/ESP32, 45. How to create telegram bot and get chat ID, 46. OV7670 Camera Module with Arduino: Color Image To PC, 47. Button controlled LED with microPython || ESP32 & ESP8266, 48. TOP 5 ESP8266 (NodeMCU) PROJECTS - Maker Tutor, 49. Controlling LED using NodeMcu and Telegram Bot, 50. Wireless Bot With Nodemcu and Dht sensor, 51. How to make CCTV camera using ESP32 CAM and also video streaming, 52. Wi-Fi RC Controller With Camera Test V1, 53. MicroPython[ESP8266] simple DC motor control sample, 54. Displaying Telegram Message on Dot Matrix Using Arduino, 55. IoT Project- Home Automation with Bolt IoT and Telegram, 56. Live-Colour Detection Using MATLAB, 57. Wireless Gesture-Controlled Robot, 58. Host Software for RFID Based Attendance Management System, 59. Javascript Based Canvas Pendulum Clock, 60. Ultrasonic Radar Model Using Microcontroller ATmega128, 61. Host Software for RFID Based Attendance Management System, 62. Wireless Hotel Ordering System, 63. Arduino Piggyback on Raspberry Pi, 64. Pre-Primary Tutor Using Arduino, 65. Designing an Eight-Bit Arithmetic Logic Unit Using ModelSim, 66. Home Automation System, 67. Fire Extinguishing Robot, 68. Raspberry Pi as Email Notifier, 69. Sixth-Sense Media Player, 70. Kansas Lava to Simulate Circuits, 71. Three Amazing Things You Can Do With Raspberry Pi, 72. GPS Master-Slave Clocks With RF Link, 73. See and Speak Using Raspberry Pi, 74. Arduino Based Gesture-Controlled Robot, 75. Android Application for an RC Charging and Discharging Circuit, 76. Electronic Door Lock Using Arduino,
0 notes
Text
Women Safety | GPS Tracking and Alerts | ESP32-CAM Take Photo and Send Image to Telegram
youtube
Women Empowerment | Life Saving SAFETY & SELF DEFENCE Hacks | Women SAFETY & SELF DEFENCE Hacks | SELF DEFENSE TECHNIQUES TIPS THAT MIGHT SAVE YOUR LIFE | SAFETY HACKS FOR GIRLS WOMEN | Women's Safety in India | Women Safety | Self Defence | Girl Power | Make Your City Safe. ****************************************************************** If You Want To Purchase the Full Project or Software Code Mail Us: [email protected] Title Name Along With You-Tube Video Link Project Changes also Made according to Student Requirements http://svsembedded.com/ è https://www.svskits.in/ M1: +91 9491535690 è M2: +91 7842358459 ****************************************************************** IOT Based Projects: Women safety device using internet of things https://www.youtube.com/watch?v=FSqYy... One Touch Alarm System For Women's Safety Security System https://www.youtube.com/watch?v=iMqsF... Arduino based women safety security system using gsm and gps modem https://www.youtube.com/watch?v=4A5U0... Women Safety Security System using 8051 and GPRS https://www.youtube.com/watch?v=5TTj2... IoT based project: SMART GIRLS SECURITY SYSTEM USING GSM & GPRS https://www.youtube.com/watch?v=A8m5G... Emergency Alert For Women Safety With Location Tracking Using Arduino https://www.youtube.com/watch?v=zI4m-... Electric Shock + GSM + GPS + ARDUINO + GOOGLE MAP + Women's Safety Security https://www.youtube.com/watch?v=xreA9... 1. Women's Safety : ESP32-CAM Take Photo and Send Image to Telegram, 2. women safety security camera photo take and send to parent mobile, 3. Women Safety Device With GPS Tracking and Alerts, 4. Women Safety Device and Application, 5. Women Safety | Location | ESP32-CAM Take Photo and Send Image to Telegram | Live Location on Google Maps, 6. Women Safety | ESP32-CAM Take Photo and Send Image to Telegram | Live Location, 7. Track a Vehicle Using Telegram App and Live Location on Google Maps With ESP32, 8. TELEGRAM • ESP32CAM • How to use ESP32Cam to Take Pictures with Telegram App, 9. Smart Wrist Band For Women Safety, 10. One Touch Alarm System For Women's Safety Security System, 11. MOTION TRIGGERED IMAGE CAPTURE AND EMAIL : Using The ESP32-CAM Board And PIR Sensor, 12. IoT Based Women Safety Using AT89S52 | Security system for women, 13. IOT Based SMART INTELLIGENT SECURITY SYSTEM FOR WOMEN, 14. IOT Based Projects: Women Security Device Using IoT Technology, 15. IOT Based Projects: Women safety device using internet of things, 16. IoT based project: SMART GIRLS SECURITY SYSTEM USING GSM & GPRS, 17. How to make an ESP32 Cam & Blynk app based Security Camera with Motion Detection, 18. GPS-GSM BASED REAL TIME WOMEN TRACKING SYSTEM AND WOMEN SAFETY DEVICE CALL / SMS ALERT USING ARM7, 19. Give a proper lens to your - ESP32-CAM, 20. ESP32-CAM| Email Captured Photos stored in SPIFF memory. |NO SD card required, 21. ESP32-CAM Women Safety Alert with Photo Capture and Send Image to Telegram App, 22. ESP32-CAM with Telegram: Take Photos, Control Outputs, Sensor Readings and Motion Notifications, 23. ESP32-CAM Telegram BOT Take Picture (TUTORIAL KAMERA TELEGRAM), 24. ESP32-CAM Telegram BOT Take Picture, 25. ESP32-CAM Take Photo and Save to MicroSD Card, 26. ESP32-CAM Send a captured photo to Telegram, 27. ESP32-CAM send a captured photo to Line Notify, 28. ESP32-CAM Send a captured photo by using Gmail, 29. ESP32-CAM PIR Intruder Alert with Photo Capture and Send Image to Telegram App, 30. ESP32-CAM Object Detection, 31. Esp32cam and PIRmotion sensor send pics to Line&Telegram|Google assistant and blynk by ESP32 cam, 32. esp32 camera take photo and send through telegram, 33. ESP32 CAM with Arduino IDE | Tutorial - Multiple CAM Secure Dashboard (ft. HTTPS, WSS), 34. Esp32 cam send captured images to Google drive, 35. ESP32 cam send captured images to AWS, 36. ESP32 CAM Motion alert on telegram, 37. ESP32 Cam Motion Alert | Send Image to Telegram, 38. ESP-32 CAM - Motion triggered image alerts to telegram bot, 39. Emergency Alert For Women Safety With Location Tracking Using Arduino, 40. EMERGENCY ALERT FOR WOMEN SAFETY WITH LOCATION TRACKING, 41. Electric Shock + GSM + GPS + ARDUINO + GOOGLE MAP + Women's Safety Security, 42. Electric Shock + GPS Hand Glove Developed to help Women's Safety & Self Defense, 43. Arduino based women safety security system using gsm and gps modem,
0 notes